
Well Dweller Elevator Parts: Find the Missing Piece
Find all three Well Dweller elevator parts in The Drains with Wind Ride, landmark routes and a missing-part checklist, then repair the lift beside the tent.
On this page+
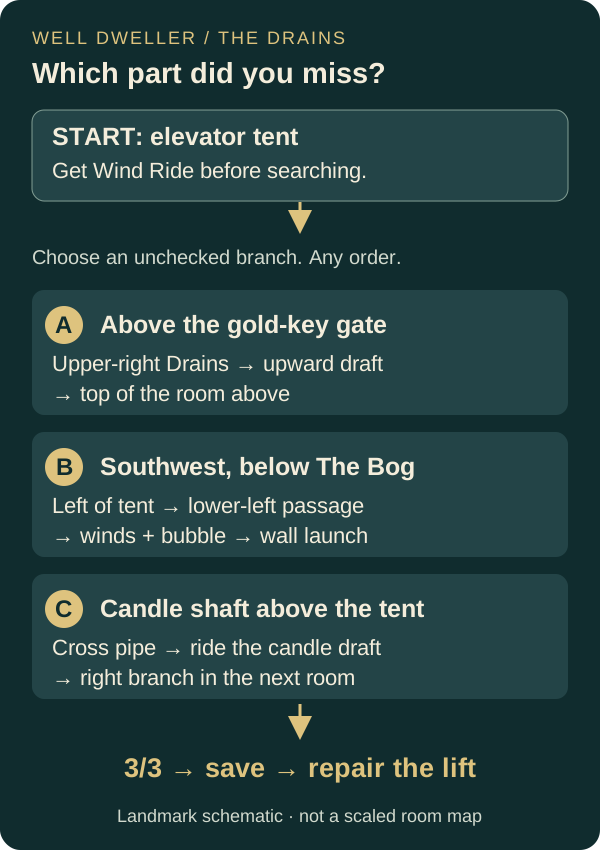
The three Well Dweller elevator parts are above the gold-key gate, in the southwest route below The Bog, and beneath Night Garden's spirit-return area. Get Wind Ride first, collect all three, then operate the broken lift beside the central Drains tent. If you already have 2/3, compare the three landmarks below to find the route you skipped.
Use A, B and C as location labels, not a required collection order. The in-game counter records how many you have; it does not identify which location remains. Start from the tent beside the broken lift whenever you need to reset your bearings.
Match the missing part to a landmark
Scroll sideways to compare all columns.
| Label | Where to look | Final approach |
|---|---|---|
| A — upper gold-gate branch | Upper-right Drains, above the room with the gold-key gate | Ride the upward draft into the room above; continue to its top. |
| B — southwest branch | Lower-left Drains, below The Bog on the world map | Cross the wind-and-spike passage left, use its bubble, then launch from a planted matchstick. |
| C — candle shaft | Beneath Night Garden's spirit-return area | From the room above the elevator tent, cross the pipe and ride the candle-lined draft; leave right in the next room. |
Get Wind Ride from the elevator tent
Leave the tent to the right. In the windy spike room, take the downward platforms near the far side rather than the right-hand exit. Descend, turn right and clear the four-enemy fight. Continue right and down to the ability egg, then finish its tutorial.
Before searching for parts, test the new action in an air current. The routes combine Wind Ride, Climb and Slingshot; if a wall launch stops you, use the planted matchstick as a foothold. The ability reference explains which action solves each obstacle.
A: climb above the gold-key gate
Find the gold-key gate in the upper-right Drains. Look above its room for an upward wind passage. Ride into the next room and keep ascending to the component.
The useful distinction is above the gate versus through the gate. The part route uses the draft. Save the locked passage for the later Golden Key quest; the seven-feather objectives explain why you will return.
B: take the lower-left route beneath The Bog
- Return to the elevator tent and travel left past Willow's first meeting spot.
- In the enemy room farther left, keep to the lower route and drop through the left opening.
- Take the left exit, climb with the draft, then continue left and down into the next passage.
- Cross the winds and spikes using the bubble. In the room beyond, plant the matchstick in the wall and bounce up to the component.
Check your map before making another circuit: this destination is southwest of the elevator, under The Bog. If you keep returning to the upper gold gate, reset at the tent and choose the left-hand branch.
C: search the candle shaft above the tent
Enter the room directly above the elevator tent. Cross the pipe, reach the higher floor and use the vertical draft framed by candles. In the next room, check the right-hand branch for the part.
Continue upward afterward if you want to open the switch connection into Night Garden. That shortcut and the component are separate stops: reaching the upper connection is a reason to check the branch below, not proof that you picked up its part.
Stuck at 2/3: check locations, then repair the lift
Scroll sideways to compare all columns.
| What you remember doing | Next check |
|---|---|
| Exploring upper Drains but never taking the southwest drop | Follow B from the tent. |
| Opening the Night Garden shortcut | Revisit C's right-hand branch below the shortcut. |
| Turning back at the gold-key gate | Follow A's upward draft instead of waiting for the key. |
| Collecting at all three landmarks | Read the repair counter at the lift; at 3/3, operate it rather than searching for another room. |
Save at the tent before riding down. The descent starts Lady of the Drains; the boss response table covers her projectiles, summoned enemy and ground wave. After winning, head right to the frogs, activate the overhead switch with Slingshot, and continue into Midnight Drench for the Golden Feather.
Watch the route and check the sources
Use the original author's recording to recognize the winds, pipes and pickup rooms. Match its destinations to A, B and C above; the recording's collection order can differ from yours.
Reviewed October 14, 2026 against Gamer Social Club's illustrated part locations and linked recording and Into Indie Games' Drains walkthrough. The latter supplies the tent-to-southwest approach and onward switch route. Our location labels, return-point checklist and diagram organize those routes for a player missing one part. The diagram is an original schematic, not an extracted game map; this review used published gameplay material rather than a new in-house playthrough.
Continue exploring
Related guides
Well Dweller Guides: Walkthrough and Collectibles
Use Well Dweller guides to choose your next route, find all 32 trinkets, beat ten Time Trials, check 100% completion and escape the Webdrench Inn chase.
Well Dweller Beginner Guide: First Route and Gear
Start Well Dweller with this beginner guide to the first boss, healing, Hunter's Cabin food, early trinkets, Climb and fast travel, with clear route steps.
How Long to Beat Well Dweller? Developer Estimate
Kyle Thompson estimates 10–12 hours to reach Well Dweller's standard ending. See what that figure includes, why playtime varies and what remains unconfirmed.
Well Dweller Walkthrough: Routes and Ability Gates
Follow this Well Dweller walkthrough through early ability unlocks, The Drains, The Docks and seven Golden Feather objectives to reach the Queen's Castle.