
Well Dweller Story Page Locations: Find All 23
Find all 23 Well Dweller story pages by book, tent and room landmark. Check ability gates, solve the two-lever door and narrow a missing page at 22/23.
On this page+
Well Dweller has 23 collectible story pages: nine for The Witch's Bargain, eight for The Dollmaker and six for The Lookout Tower. Open the Pages menu and identify the unfinished book first, then use its routes below. At 22/23, the book counter narrows your search to nine, eight or six locations instead of the whole kingdom.
Choose The Witch's Bargain, The Dollmaker or The Lookout Tower. For one remaining pickup, jump to the missing-page checks.
Prepare a return trip around your abilities
Use Tent Travel to reach a named tent, then follow the connected-room directions. Bring Slingshot, Climb and Hover for a broad cleanup pass. Endless Climb helps with the long connector shaft and late routes; Water Vessel opens the underwater approach. The last castle route also requires access through the seven-Golden-Feather gate.
Treat these as a practical return-trip loadout. A page can sit in an easy room reached through an earlier ability gate. If your current obstacle is the approach, use ability unlocks before retrying the pickup itself.
The W, D and T labels below are this guide's checklist IDs, not page numbers in the game. Match book + region + landmark. The Lookout Tower book has pages outside the tower, and one connector pickup is described as The Well in one source and the Bog–Drains tunnel in another.
Combine nearby checks when several books are short
Choose a tent that serves more than one unfinished route, then record each pickup separately:
- Hunter's Cabin central tent: W2 uses the upper crate room; D1 follows the lower return passage. Completing one exit leaves the other worth checking.
- Gravenvalley tent: W3 is the bell-operated crossing; T3 takes the Ticket Office branch. A page near the bell does not clear the hidden space above the office.
- Lookout Tower bottom tent: pair T4's upward platform ride with T5's western loop before moving to another region.
- Dollmaker's House central tent: compare D5's puzzle room and D6's high western route, then check your side of D7's lever gate. The other lever starts from Burial Vault's left tent.
This groups return visits by starting point. Use your book counters to skip a route you have already completed.
The Witch's Bargain: nine pages
Check Night Garden ×1, Hunter's Cabin ×1, Gravenvalley ×1, Midnight Drench ×2, Desiccated Castle ×3 and Queen's Castle ×1. Completing this book earns The First-Born Daughter.
W1 — Night Garden: moving-spike alcove
Use the starting Well as your map reference. Find the moving-platform room roughly five rooms east and one below it. Cross the first platform group, then inspect the side alcove with moving spikes for the page. Finish checking that recess before continuing along the main platform route.
W2 — Hunter's Cabin: upper-right crates
From the central tent, take the upper connection, then its lower-left exit. In the next room, climb the stacked crates toward the upper-right corner. This Witch page is a different pickup from the Dollmaker page on the moving-crate return route below.
W3 — Gravenvalley: bell-operated platform
Go three rooms east of the Gravenvalley tent. Reach the bell from its right-hand side, activate it and use the moving platform to cross toward the page. Position yourself for the crossing before ringing; the bell is part of the route, rather than a collectible marker.
W4 — Midnight Drench: rooftops and hidden right wall
Start from the upper Midnight Drench tent. Follow the rising eastern branch and continue east to the sloping rooftops. Cross the roofs and inspect the right-hand wall for the concealed continuation. Keep this rooftop pickup separate from the bubble route in W5.
W5 — Midnight Drench: bubble route from the castle
Approach from Desiccated Castle's central tent. Use Slingshot with the lowered pillar immediately east to reach the upper exit, then take the right-hand connection back into eastern Midnight Drench. Ascend at the next opening and link the bubbles with Hover to reach the page.
W6 — Desiccated Castle: upper rooms
From the top tent, take the east, up and west connections. In the following room, climb through the upper exit to the page room. Record this as the upper-room pickup; finding it does not clear the castle's timed-pillar or post-Queen pickups.
W7 — Desiccated Castle: rising pillar and spike crossing
From the top tent, descend and follow the eastern route through three rooms. Activate the floor mechanism with Slingshot, ride the rising right-hand pillar and plant the matchstick toward the left support when the moving obstacle allows a crossing. Bounce across to the page rather than dropping back to the mechanism.
W8 — Desiccated Castle: after evading the Queen
Finish the Evade the Queen sequence and check the next room. The page is reached along the right-hand wall, using a Slingshot foothold and Climb. If you remember escaping but immediately continued toward the next objective, this reward room is a useful separate check.
W9 — Queen's Castle: upper-left room corner
After opening the castle with seven Golden Feathers, use its right tent. Go two rooms west, then down and west. Climb toward the top-left of that room, bringing Hover and Endless Climb for the late-game approach. This page belongs to Queen's Castle; the three earlier castle entries belong to Desiccated Castle.
The Dollmaker: eight pages
Check Hunter's Cabin ×1, The Bog ×2, Autumn Forest ×1, Dollmaker's House ×3 and Burial Vault ×1. The associated achievement is The Tattered Doll, whose Steam description calls the book “The Dollmaker's House.”
D1 — Hunter's Cabin: moving-crate passage
From the central tent, take the east connection, then the lower-left branch and descend toward Night Garden. At the pair of moving crates, use their upper surfaces to reach the elevated hidden passage. Search above the return route instead of following its floor straight out of the cabin.
D2 — The Bog: western route from the right tent
Use The Bog's right tent and follow the connected route four rooms west to the page. This is the western-route pickup. Compare it separately with the high ledge near the left tent in D3; both belong to the same book.
D3 — The Bog: high shelf near the left tent
At the left-tent area, look for the raised steps and the page on the wall to the right. Throw the matchstick from the upper step to create a foothold, then rebound above the shelf's spiked left edge to land on top. Wall Sling gives another late-game setup for this high-wall return. Aim to clear the spike fringe rather than climbing through it.
D4 — Autumn Forest: hidden passage beside Ilda
After the Forest King encounter, check the Golden Feather reward area. Look to the right of Ilda for the concealed wall passage and enter it for the page. Collecting the feather and collecting this page are two separate actions in the same onward area.
D5 — Dollmaker's House: puzzle room above the central tent
From the central tent, ascend and turn west into the puzzle room. Bring Hover and Climb for its approach and collect the page there. Use “upper puzzle room” as your checklist landmark so it stays distinct from the nearby high foothold route.
D6 — Dollmaker's House: high route west of the central tent
Leave the central tent to the west and look upward at the first short branch. Create a Slingshot foothold, then combine the rebound, Hover and climbing to reach the higher page. For the return pass, Endless Climb removes the stamina pressure on the long ascent.
D7 — Dollmaker's House: door controlled from two areas
Open both levers before returning to the page's gate. One approach starts at Dollmaker's House's central tent, heading down and east. The other starts at Burial Vault's left tent, heading three rooms west. Check the lever on each side; revisiting only the page door leaves the other half of the route unfinished.
D8 — Burial Vault: concealed low passage
From Burial Vault's right tent, follow the west, down, west, up and west connections. At the low concealed opening, slide through to the page. If you reach the correct room but keep searching its upper platforms, return to the floor-level passage.
The Lookout Tower: six pages
Check Night Garden ×1, the Well/Bog–Drains connector ×1, Gravenvalley ×1, Lookout Tower ×2 and The Deep ×1. Completing this book earns Above the Kingdom.
T1 — Night Garden: ledge above the room entrance
From the top tent, descend through two rooms and take the western connection. Look directly above the entrance in the next room. Bring Hover with Slingshot and Climb for a comfortable return to the elevated page rather than searching along the floor.
T2 — The Well / Bog–Drains connector: waterfall shaft
Approach from The Drains tent, following the western, gradually rising connection toward the Well. At the falling water, climb the long shaft and inspect the concealed space near its roof. Bring Endless Climb for this return. A marker described as “The Bog” can refer to this connector; compare the waterfall shaft before searching a second supposed location.
T3 — Gravenvalley: above the Ticket Office
From the Gravenvalley tent, descend through the shortcut, take the eastern downward shaft and follow the east, up, east and up connections toward the Ticket Office. On its right, make a Slingshot foothold and rebound into the concealed upper space for the page.
T4 — Lookout Tower: moving-platform climb
Use the bottom tent and ascend two rooms. Time the moving-platform ride to reach the page above. This is the vertical pickup near the tent; the second tower page takes the western loop in T5.
T5 — Lookout Tower: western loop
From the bottom tent, go west, down, west and up. Use a Slingshot rebound to reach the page, with Hover and Climb available for the approach. Count this loop separately from the moving-platform climb even though both start at the same tent.
T6 — The Deep: return through the water current
Bring Water Vessel and enter The Deep through the eastern underwater entrance from The Docks. Follow the right, down and left connections to locate the page in the water passage. Continue below it and take the next upward route to approach the pickup from the other side of the current.
Missing one page: choose the next trip
At 22/23, first check which book is short. Use the relevant branch below to compare a few different access actions before doing another full-map sweep.
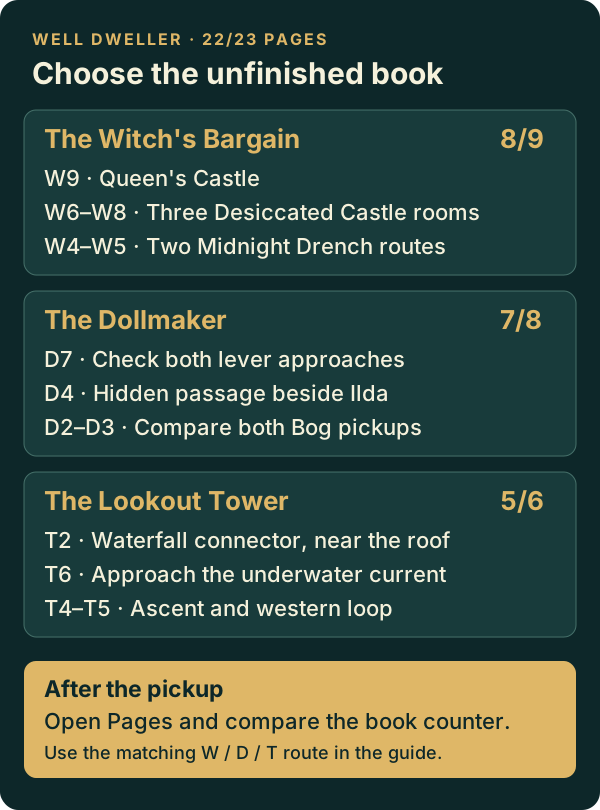
- Witch's Bargain at 8/9: if you have not searched Queen's Castle, start with W9. Otherwise compare all three Desiccated Castle landmarks and both Midnight Drench routes. One castle page does not clear the castle, and one Drench page does not clear both entrances.
- Dollmaker at 7/8: if the two-lever gate is shut, finish D7's other approach. If you already claimed that page, compare Ilda's hidden reward-area passage, both Bog pickups and all three House rooms.
- Lookout Tower at 5/6: check the waterfall connector and underwater current before repeating only the tower. If those are done, compare the tower's moving-platform ascent with its separate western loop.
For an unhelpful map hint, inspect unexplored exits as well as known rooms: the tent's collectible hints cover rooms you have visited. Use Glass Eye for concealed passages and Rusted Compass to check whether a collectible remains in a room; Trinkets lists where to obtain them. A signal still needs to be matched to the page's entrance.
After collecting a candidate, reopen Pages and compare the book counter before marking the route complete. If the book is finished but your save remains at 99%, switch to the completion checklist; trinket slots, unexplored rooms and trial rewards need their own checks.
Visual reference for a difficult pickup
Use the original creator's footage to compare a room or movement setup. The written checklist here groups locations by book, so its W/D/T labels use a different order.
Sources and review date
Prepared by Well Dweller Wiki on October 31, 2026, comparing OhNoNotAddy's original illustrated guide, spejsikx's book-grouped location records, Gamer Guides' book-marker totals and the Steam achievement descriptions.
The tent approaches follow the location records; the original illustrated guide supports the book assignments and pickup landmarks. The book-first diagnosis, shared-tent return groups, distinct-room labels, return-trip loadout and diagram are this wiki's organization of those records. This is a source comparison of release guides, rather than an in-house recorded playthrough. The editorial policy explains review labels and how to send a correction with your platform, room and version.
Continue exploring
Related guides
Well Dweller Guides: Walkthrough and Collectibles
Use Well Dweller guides to choose your next route, find all 32 trinkets, beat ten Time Trials, check 100% completion and escape the Webdrench Inn chase.
Well Dweller Beginner Guide: First Route and Gear
Start Well Dweller with this beginner guide to the first boss, healing, Hunter's Cabin food, early trinkets, Climb and fast travel, with clear route steps.
How Long to Beat Well Dweller? Developer Estimate
Kyle Thompson estimates 10–12 hours to reach Well Dweller's standard ending. See what that figure includes, why playtime varies and what remains unconfirmed.
Well Dweller Walkthrough: Routes and Ability Gates
Follow this Well Dweller walkthrough through early ability unlocks, The Drains, The Docks and seven Golden Feather objectives to reach the Queen's Castle.